- 1) Preparation: What Migrates and What Doesn’t
- 2) Install the Configuration Export/Import Plugin
- 3) Export Aimogen Configuration
- 4) Prepare the Target Environment
- 5) Import Configuration
- 6) API Keys and Provider Setup
- 7) Scheduled Rules and Cron
- 8) Embeddings
- 9) Chatbots & Embeddings Mapping
- 10) Testing After Import
- 11) Post-Import Cleanup
- 12) Tips & Best Practices
- 13) Troubleshooting
- Summary
Migrating Aimogen — including all its settings, rules, generators, chatbots, workflows, and related configuration — between environments (development → staging → production or local → live) should be safe, repeatable, and transparent. Because Aimogen stores execution rules, API keys, limits, and embeds configuration in a mix of plugin options, post meta, custom post types, and sometimes custom database tables, the safest migration path is exporting and importing the configuration explicitly, not simply copying the site database.
For that purpose, you can use the CodeRevolution Configuration Import/Export Helper Plugin for WordPress (the plugin you linked from CodeCanyon). This helper gives you a standard way to export Aimogen’s settings and then import them into another environment.
The key idea is: migrate configuration only, not content or runtime data. Content and logs are usually environment-specific. Config is what matters for stable AI behavior.
1) Preparation: What Migrates and What Doesn’t #
Before doing anything, it helps to know what we intend to move:
You should migrate:
- API keys (usually must be re-entered in production for security — discussed below)
- Aimogen global settings (execution rules, usage limits, provider preferences)
- Scheduled bulk rules
- OmniBlocks workflows
- Chatbot setups and personas
- Embeddings index mappings (not the vector data, except if you export and re-import them)
- Usage limits and roles/permissions configuration
- REST API configurations
You should not migrate blindly:
- Actual API keys (for security; production should use its own keys)
- Usage logs and execution logs
- Scheduled runs artifacts
- Embeddings indexes (optionally you can export externally, but often best to regenerate)
- Content created in development
The migration plugin helps you export the configuration, not the content.
2) Install the Configuration Export/Import Plugin #
On both source and target sites:
- Install and activate CodeRevolution Configuration Import/Export Helper Plugin.
- Ensure Aimogen is installed and activated.
On the source environment you’ll export Aimogen settings. On the target you’ll import them.
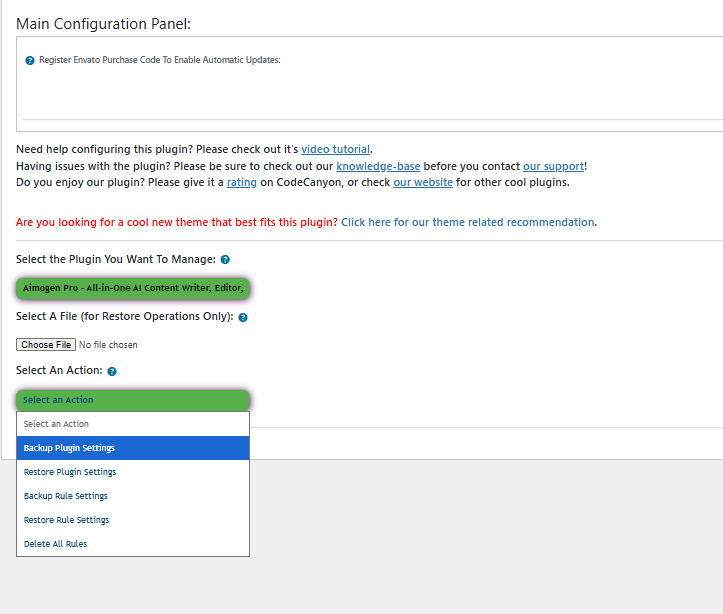
3) Export Aimogen Configuration #
On the source site:
- Go to the configuration export screen provided by the helper plugin.
- Choose Export Configuration.
- In the list of plugins/configs, select Aimogen.
- Make sure you include the sections you need:
- Global plugin settings
- Provider setups
- Limits
- Chatbots
- Schedules (rules)
- OmniBlocks / workflows
- Shortcodes/settings
- Generate the export file.
This will produce a JSON file containing the Aimogen configuration.
Important:
Do not include sensitive API key values in an environment where those keys should differ. If your export tool includes them, remove them manually from the JSON or avoid exporting keys.
4) Prepare the Target Environment #
On the target site:
- Install the same version of Aimogen (ideally matching the source environment).
- Install the import helper plugin.
- Make sure all required AI provider API key settings are available but do not import production API keys into dev or vice versa (for security and billing control).
If your environments use different API keys (typical), you’ll enter them manually after import.
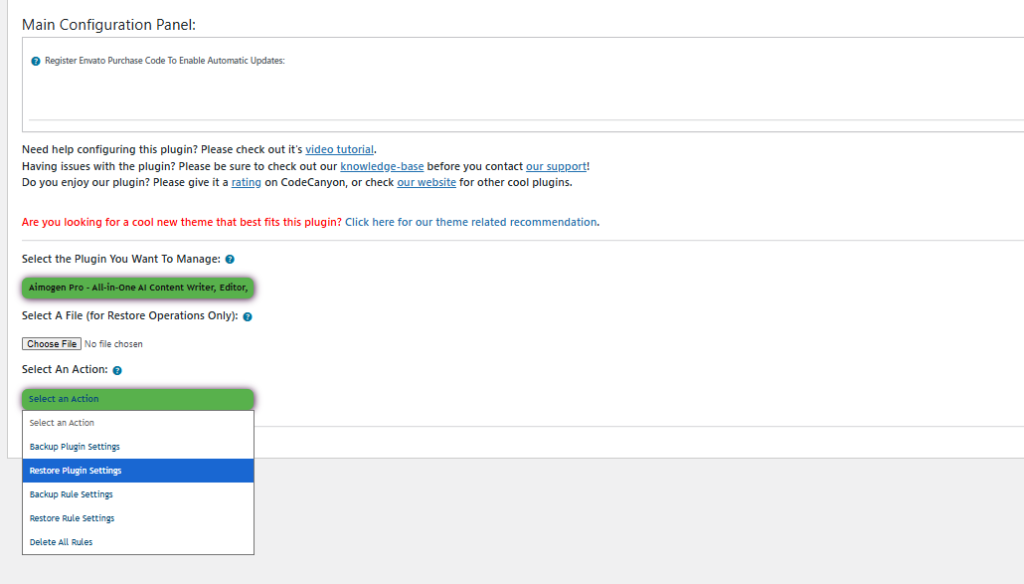
5) Import Configuration #
In the target environment:
- Go to the import screen of the helper plugin.
- Upload the JSON you exported.
- Map any environment-specific overrides if the import helper offers mapping (e.g., environment URLs, site names).
- Import.
Aimogen’s settings, rules, chatbots, workflows, and usage limits will be recreated in the target.
Note:
Post-import, you will need to enter or validate provider API keys because keys should not be migrated in plaintext between environments for security reasons.
6) API Keys and Provider Setup #
Because API keys are sensitive:
- After import, go to Settings → API Keys in the Aimogen menu.
- Enter the appropriate keys for the environment (development vs staging vs production).
- Save and verify each provider and model list appears correctly.
Your imported rules will now reference real provider configurations.
7) Scheduled Rules and Cron #
If your Aimogen configuration includes scheduled bulk generation or workflows:
- Verify that WordPress Cron is functioning on the target environment.
- On production, ensure a real cron (WP-Cron via server cron or a real cron job) is configured. Aimogen schedules bulk jobs through WP-Cron.
- Confirm migrated schedules appear in the list.
8) Embeddings #
Embeddings can be large and environment-specific.
- You can choose to migrate index metadata via the config export if the helper plugin supports it.
- In many cases, it’s safer to regenerate embeddings in the target environment because they depend on the target content and language.
If you did migrate embeddings indexes, verify them after import.
9) Chatbots & Embeddings Mapping #
If you use chatbots that depend on embeddings:
- After import, ensure the correct embeddings index is assigned to each chatbot.
- Check that persona prompts and responses still align with your language and content expectations.
10) Testing After Import #
Before allowing automatic generation or automated workflows to run:
- Test single AI generations
- Test a chatbot interaction
- Test a scheduled rule execution manually
- Validate usage limits and permissions
This confirms that the imported configuration behaves as expected.
11) Post-Import Cleanup #
After everything is imported and verified:
- Remove the import/export helper plugin from production if it’s not needed there (better security).
- Keep a backup of the exported JSON for future environment syncs.
- Document any environment-specific overrides (e.g., provider URLs, limits).
12) Tips & Best Practices #
Keep environments aligned:
If you’re regularly migrating between development and staging, maintain a versioning plan for the exported configuration JSON files.
Handle API keys securely:
Never export live API keys into dev or staging — use environment-specific keys.
Test carefully:
Run a few manual generations and chatbot prompts before letting automation run.
Regenerate embeddings if content differs:
If the target environment has very different content, regenerate embeddings.
13) Troubleshooting #
If something doesn’t work after import:
- Check for missing settings in the imported JSON (e.g., connectors that weren’t selected).
- Verify that provider API keys are entered and valid.
- Inspect Usage Logs and Execution Logs for blocked or failed executions.
- Confirm that scheduled tasks (cron) are enabled and running.
Summary #
Using the CodeRevolution Configuration Import/Export Helper Plugin makes Aimogen migrations reliable across environments. The safe migration pattern is:
- Export only configuration (not sensitive keys).
- Prepare the target environment.
- Import and validate.
- Enter environment-specific API keys.
- Test execution.
- Enable scheduled automation.
This ensures that your AI setups — bulk rules, chatbots, workflows, language and usage policies — move predictably between environments without breaking workflows or leaking keys.
If you want, I can provide a step-by-step screenshot sequence or checklist specific to your Aimogen configuration. Just tell me what parts of Aimogen you need included in the migration (chatbots, workflows, embeddings, bulk rules, etc.).


